Sample images
While you read this manual you may download this disk image
with 4 samples (8 images mainly from Yosemite National Park):
Samples (7.4 MB)
Guide for DoubleTake version 2.0
This page is for DoubleTake version 1.6.2.
Guide for version 2.0
|
Starting DoubleTake
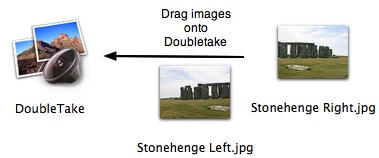 To stitch two or more images seamlessly together, wide or
tall panorama, drag them onto DoubleTake. This will also work
when DoubleTake is in the Dock, or if you drag from iPhoto. To stitch two or more images seamlessly together, wide or
tall panorama, drag them onto DoubleTake. This will also work
when DoubleTake is in the Dock, or if you drag from iPhoto.
When DoubleTake opens the images, it takes a look at the edges
of the images and makes a guess about the arrangement, left,
right top or bottom. The guess may be mistaken, but you can
drag the images into the correct order. Perhaps with one click
on the zoom out button to increase the overview.
If you drag all the images you wish to join at once you get
the automatic guess. If you drag one image at at time it gets
dropped where you release the mouse.
|
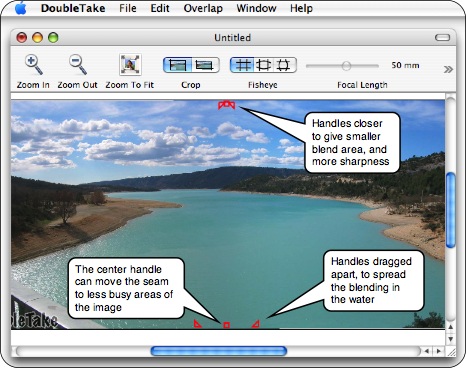
Adjusting the seam
On this screenshot you can vaguely see a colorshift in the
water because of the seam.
To make a wider seam and spread out the color change, drag one
of the bottom triangular handles, until the transition is
smooth.
Keyboard Shortcuts
Without other keys held down: + and - zooms in and out.
Alt key held down while dragging anywhere in the window,
scrolls everything.
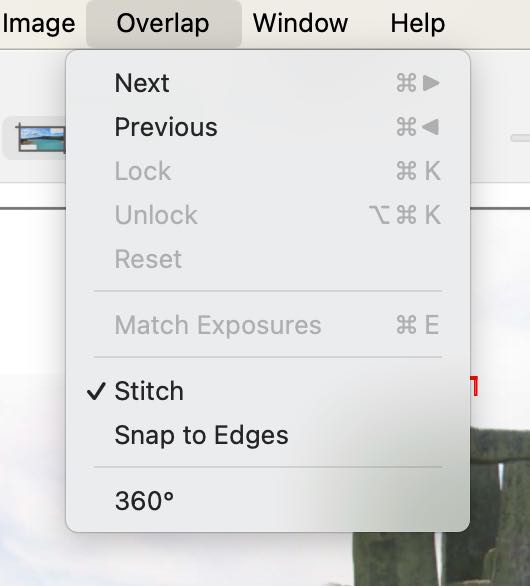
Locking Overlaps
When you wish to stitch together many images, it is convenient
to be able to lock an overlap when it has been aligned. This
is the purpose of the overlap menu. The space bar is an
alternate shortcut for locking an overlap.
Images locked at the overlaps will move together with the
mouse.
If you select more than one image by clicking on it while
holding town the shift key, you can also move the images
together.
|
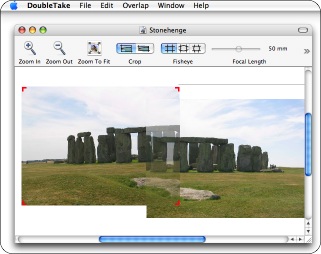
Moving and aligning
When you drag the images the overlap is shown with transparent
images.
This allows you to align the edges in the images, and better
decide if you want to move the seam away from the middle of
the overlap. A diagonal seam can be useful in some cases.
Undo is supported to undo unintended move(s).
Keyboard Shortcuts
Single click on one image selects it (shown with small red
handles). Then it can be moved with arrow keys, and deleted
with backspace.
|
And when it looks just right
You save the finished image, and perhaps you drag the saved
result back into iPhoto if that was where the images came
from.

|
Crop, Fisheye & Focal length
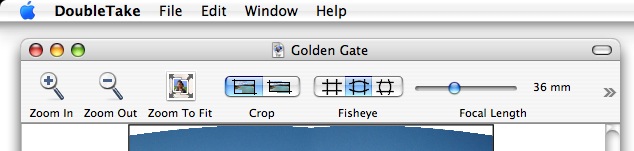
Crop
DoubleTake offers two ways of cropping of the result. Either
the total crop, where the white areas surrounding misaligned
picture are included. Or inside cropping with no white
areas.
Fisheye
Lets you apply fisheye-style distortion to the image. Good if
the image has straight lines across the seam area close to the
edges of the image. You can turn this feature off, with
horizontal lines bent or with vertical lines bent.
Focal Length
This is only used for the fisheye distortion. The shorter the
focal length used when the picture was taken the more
distortion. You can adjust the slider and ignore what the
camera may have written into the image file when the image was
taken.Then you can use the manual override, to tell DoubleTake
what focal length the images were taken at.
|

More iPhoto integration
When you work with many images in one panorama, it can happen
that a few of the images are exposed differently, or rotated a
bit.
Perhaps the differences are not apparent when images are
viewed separately in iPhoto, but side-by-side viewing in
DoubleTake reveals the differences.
iPhoto has good exposure and rotation tools, so you can use
those even after you have opened the images in DoubleTake.
When you switch back to DoubleTake, it will notice which
images have been changed, and reload those.
|
 Many images Many images
When you drop many images into DoubleTake, Zoom to fit will
make the overlaps rather small. If you then zoom in to see
each overlap clearly you can jump to the next overlap with the
Next and Previous menu (and their shortcuts).
The lock and unlock function can be used when you have
adjusted an overlap, and you don't want to move the images
apart by accident. The 2 images now select and deselect
together, and they move together when you drag with the
mouse.
Reset is only if you have adjusted the seam width or dragged
the seam away from the center of the overlap.
DoubleTake file format
If you have arranged many images, you may save the arrangement
as well as saving the completed image. This is good if you
want to make a change later. Then you don't have to rearrange
all the images again.
The format does not save copies of the images, but just their
location on your disk. If you move the images, then you should
put the DoubleTake file the same place, so it can find
them.
An other reason to save these files is if DoubleTake gets new
features, then it is easy to open old image sets.
|
Limitations
The images should be arranged either horizontally or
vertically. In this version (DoubleTake 1.6) "matrix"
arrangement is not actively supported (but not prevented
either).
The images should be taken at the same resolution, and for
best results with the same exposure. Most cameras have a
feature which lets you take more pictures with the same
exposure and focus settings. If this is not done you can
adjust images to be evenly exposed in iPhoto.
iPhoto 5's rotation feature is very well made and excellent
for straightening up images if needed.
Miscellaneous
AppleScript Menu item for tighter integration with iPhoto:
download (200 kB). This is
currently just an other convenient way of opening images in
DoubleTake from iPhoto, where the menu is used instead of drag
and drop. Now this tip is not that needed as DoubleTake
understands copy & paste from iPhoto. Time will show what
happens with Automator.
Contact
Feedback, report bugs and questions
are welcome to:
Henrik Dalgaard
Echo One
feedback@echoone.com
My time zone: Central European - I live in Denmark.
|
|
