File Juicer for macOS

Disk Images with Disk Utility
File Juicer can search disk images for data - just like any other kind of file. This is useful in forensics. To work with entire hard drives you will need enough disk space to hold a complete copy of the disk you are making a copy of, and space enough left to save the images/data you recover.
Note: This procedure is not recommended if you have lost data on your Mac and you do not have an extra hard disk. The more files you save on your Mac after you have lost files by accident, the less likely it is that you can recover the images (or other lost files). Downloading software, and putting new data on your disk, will have a chance of writing over the things you wish to recover.
Read the entire page first. If you don't understand the purpose of disk images - or you have lost important data, I recommend using a data recovery service like DriveSavers

Making Raw Disk Copies in Disk Utility
Disk Utility can copy the raw contents of a hard disk into a disk image. This will allow you to do search and rescue operations on hard disks.
Disk Utility is in the Utilities folder in your Applications folder. The same place is also the "Terminal" and application you need to enable the advanced features of Disk Utility.
Open Terminal and type in this command in the text window. After you press return Terminal will enable the extra feature - complete copy of the entire drive - no matter how corrupted it is as long as it is not a hardware malfunction (signs: smoke/very hot drive/unusual noises).
defaults write com.apple.DiskUtility advanced-image-options 1This is how it looks just before you press the return key.

Now you can Quit Terminal.

Make Disk Image
In this case I show how to make a disk image of a compact flash card. This is what File Juicer does - before doing the recovery.- Insert the flash card in your flash card reader.
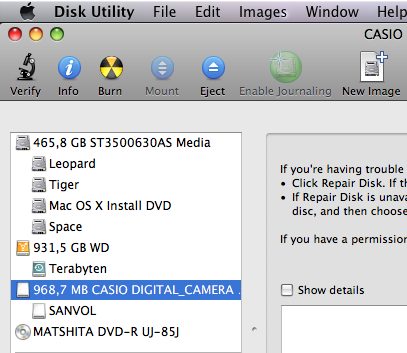
- Start Disk Utility.
- Pick the disk you wich to make an image of
- Click "New Image" in the tool bar
-

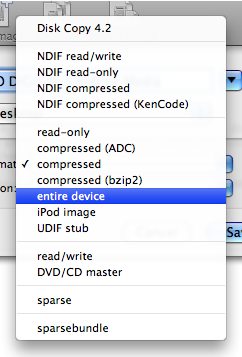
- Pick "Entire Device" (or "Read Only" if you skipped the Terminal step above)
- Save the disk image a place where there is enough free disk space!
Run the Disk Image through File Juicer
Drop the disk image on File Juicer and let it do the complete search.
Things to consider
- Search only or what you need. On a camera flash card this may likely only be JPG or RAW images.
- If you are searching large disk images - make sure FIle Juicer saves the found files a place where there is available disk space. You set this if File Juicer's preferences
- You may not need to watch File Juicer show what it finds while it does the search. You can disable this with the checkbox in File Juicer's main window. You can change this while it works.
- File Jucier will not recover fragmented files, as it does not use any assumptions of the format of the disk image. MacOS X 10.3 and newer atutomatically keeps disk fragmentation (for files smaller than 20 MB) low for performance reasons, but there will still be fragmented files which File Juicer will miss.