
File Juicer for macOS
iPhoto and Apple Photos
Apple replaced iPhoto with Apple Photos in 2015. If you still have an old iPhoto library on a Mac that can run iPhoto, the simplest path is to let Apple Photos import it. Photos will offer to do this the first time you open it.
Migration is not always practical. The library may be very large, you may not want to merge it with your current Photos library, or the Mac running iPhoto may be too old to run a version of macOS that supports Photos. In those cases, extracting the photos directly with File Juicer or Finder is a reasonable alternative.
Apple Photos has the same basic structure
Apple Photos still stores originals, previews and thumbnails inside a library package, just as iPhoto did. The internal folder layout has changed several times since 2015, but the principle is the same: your original files are in one folder, and lower-resolution versions for quick display are in others.
One important difference from iPhoto is that Apple Photos does not keep your original file names. Images are stored under long computer-generated names, which makes it difficult to search for a specific photo by filename in Finder. File Juicer extracts what it finds without relying on file names, which is often the most practical way to get images out of a large or damaged Photos library. See the Photos Library page for more detail.
Extract Photos From Your iPhoto Library
If your iPhoto Library gets damaged beyond repair, or you cannot open it, you can extract the photos directly.
Where iPhoto stores images
When you import photos into iPhoto, a lot of work is done for you to keep track of them fast and easily. iPhoto opens each image and creates several smaller versions of it.If the iPhoto database gets damaged, iPhoto can try to repair it, but it is good to know that the images are not stored inside the database, and where you can find copies. File Juicer can even open the ithmb files on the iPod Photo.
- The original image is copied into a folder named after the day you took the photo
- A smaller resolution version which fit well to your screen
- 3 sizes of thumbnail icons.
- A version for your iPod Photo if you have one
Corrupt iPhoto database - finding lost images
 This is rare, but if no images show up when you start iPhoto, don't panic. They are likely still there in some form.
Because iPhoto makes many versions of the same photo, you may destroy the original and still get something back, if
you know where to look for them.
This is rare, but if no images show up when you start iPhoto, don't panic. They are likely still there in some form.
Because iPhoto makes many versions of the same photo, you may destroy the original and still get something back, if
you know where to look for them.
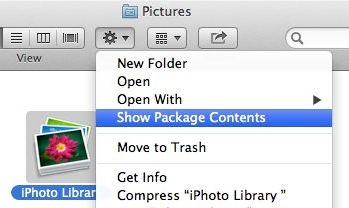
You can rebuild the iPhoto database, but before you do so, take a look inside the iPhoto Library folder.
To open the iPhoto Library with Finder, select it and pick "Show Package Contents" from the gear menu.
You can copy photos out from here, but don't delete anything if you wish to be able to rebuild the library and keep your comments, tags and arrangements in albums.
The originals and the edits
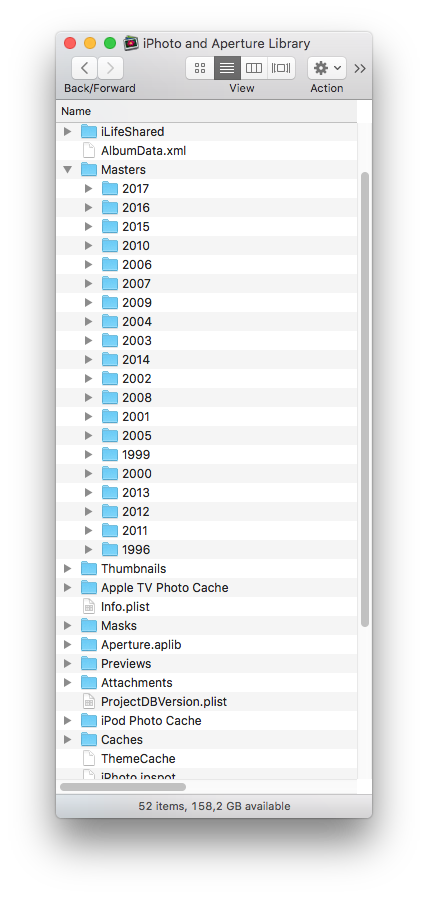
Each image can be in many albums and slide shows, but the image is not copied as much as you could fear. In the screen shot to the right, I have opened the "date" named folders to reveal the 3 versions of the same photo taken August 7 2005. The "Thumb" called 984.jpg is 248 by 180 pixels, and this is what iPhoto show when its view is set to a medium size. Because I have cropped and rotated the photo, the original has been moved to its own folder, and the edited image is now where the original was before the rotation and crop.
Screen resolution images
When you navigate in iPhoto, the full resolution image is not shown immediately. First the screen resolution image is shown, and it may be scaled up to fit the area you have set iPhoto so show. This is why it seems blurry at first, until a second later when the full resolution image is displayed.Thumbnail icons
When you have zoomed out in iPhoto to get an overview of about 100 images at once, the above "Thumb" is no longer used. iPhoto keep 128 by 128 pixel JPEG versions in the file called ThumbJPEG.data. If you can not get to any of the above versions of your photos, drop ThumbJPEG.data on File Juicer, and it will extract copies of every of the JPEGs inside.You can also get an even faster overview of what iPhoto (older versions than about 2010) has in its database by dragging the Thumb64.data or the Thumb32.data onto File juicer. It will make one or more TIFF files with a mosaic of all the icons.

Duplicates
If you extract all images from iPhot with File Juicer, File Jucier will recover all there is. This includes previews and thumbnails. Therefore you will likely end with several versions of the same images, and this can be tedious to sort out afterwards. Duplicate removal tools like Tidy Up! are best to detect exact duplicates. It is not so good for finding duplicates of the same image in different sizes. Therefore if you want to pull out images From your iPhoto Library with File Juicer, drop in the Masters (named "Masters" in iPhoto '09 and newer) folder if you only wish to recover those. Or use Finders search function for images do the same task.
iPod Photo's cache
If you have an iPod Photo, iPhoto makes images for it too. They can come in handy if you should somehow lose your iPhoto versions of your images.They are stored inside the iPod Photo's cache, in a ".ithmb" format suited for television. "ithmb" is raw uncompressed pixels in YUV color. File Juicer can convert this to TIFF. They are 720 by 480 pixels, which is the best of the low resolution formats iPhoto keeps track of. One downside with this is that the filenames of these images are just numbers.
The ithmb files on the iPod are larger, and largest contain the same images you find in the iPhoto iPod cache. They can be extracted by File Juicer too. The smaller ithmb files contain the same images in sizes: 176 x 220 pixels, 130 x 88, and 41 x 30 pixels.
Rebuild the iPhoto database
When you have looked after your images in the places above, you know what you have, and you can try to rebuild your
iPhoto database. You do this by holding down the command and alt keys while you start iPhoto.
This may take hours depending on the options you choose, as iPhoto possibly has a lot of work to do.